|
To begin
throughput testing, you need to launch both the client and server
on different computers, as described in the previous chapter. In
the client window, enter the IPv4 or IPv6 address of the server and
click Connect.
The client will attempt to connect to the server, and if the
connection is successful, continuous throughput testing will
commence. This will continue until you click Disconnect.

The
client window displays TCP and UDP upstream and downstream
throughput values (both current and averaged), loss percentage for
UDP streams, and the round-trip time. The same data are illustrated
by a dynamically updated chart. The chart can display Throughput,
Loss, or RTT values, depending on your selection. Note that the
application uses Mbps, i.e. Megabits per second (not Megabytes!) as
the measurement unit. Right-clicking on the chart allows you to
clear the chart data, copy the chart, save it as a PNG file, or
toggle the 3D view on and off. The status log window at the bottom
displays messages about the current application status. If you
would like to perform TCP tests only, without UDP, check
the TCP
only box.
On
Android devices, the interface is organized slightly differently.
The first application screen is used for specifying the server IP
address and port, while the second screen displays the charts, as
shown below:
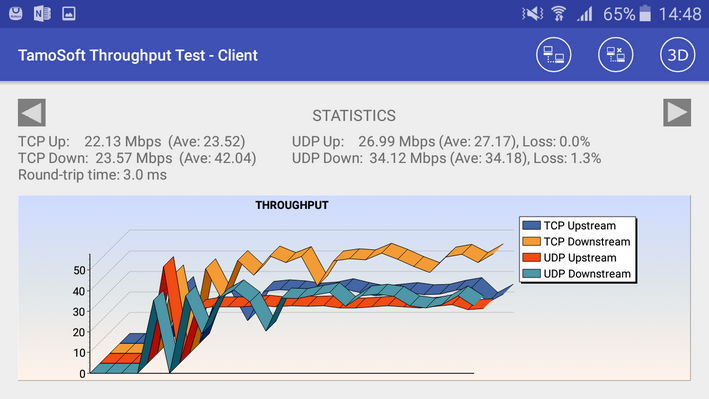
Swipe the chart
to switch between Throughput, Loss, and RTT views. Click
the 3D button
on the tool bar to toggle the 3D view on and off.
QoS Testing
Advanced users
might want to use the QoS
traffic type control to
specify the Quality of Service traffic type that will be associated
with the TCP and UDP data streams that are sent and received by the
application. A description of the use of QoS and related standards
and technologies, such as WMM, 802.11e, DSCP, and 802.11p, is
beyond the scope of this manual, but in brief, there are two
reasons why you may want to use this functionality:
|
·
|
To check how
different QoS traffic types affect throughput. In a properly
designed WLAN that uses enterprise-class APs, throughput values for
high-priority traffic should exceed those for normal-priority
traffic.
|
|
·
|
To verify
end-to-end QoS network design. In a properly designed WLAN,
QoS-tagged traffic must traverse the overall network from the
source to the destination through wireless and wired segments with
different technology and protocol implementations. When testing
this scenario, you should use TamoSoft Throughput Test for
generating QoS-tagged traffic, and use packet capture and analysis
tools, such as CommView and CommView for WiFi (for wired and wireless LANs,
respectively,) to inspect the packets and verify the QoS or DSCP
values in the packets.
|
The
table below summarizes different QoS traffic types that you can
use. Please pay attention to the fact that not all the QoS types
available in the application and described below have corresponding
WMM access categories. In practice, this means that when you run a
TamoSoft Throughput Test on a WLAN client and select a QoS type
that has no WMM mapping, your Wi-Fi adapter driver might fail to
QoS-tag packets at all.
|
QoS Type
|
Description
|
|
Best
Effort
|
Flow traffic
has the same network priority as regular traffic not associated
with QoS.
This traffic
type is the same as not specifying priority, and as a result, the
DSCP mark and 802.1p tag are not added to sent traffic. Corresponds
to the WMM AC-BE access category. On Mac OS X, packets are tagged
with Class Selector CS0.
|
|
Background
|
Flow traffic
has a network priority lower than that of Best
Effort. This traffic type
could be used for traffic of an application doing data
backup.
Sent traffic
will contain a DSCP mark with a value of 0x08 and an 802.1p tag
with a value of 2. Corresponds to the WMM AC-BK access category. On
Mac OS X, packets are tagged with Class Selector CS1.
|
|
Excellent
Effort
|
Flow traffic
has a network priority higher than Best
Effort, yet lower than
AudioVideo.
This traffic
type should be used for data traffic that is more important than
normal end-user scenarios, such as e-mail.
Sent traffic
will contain a DSCP mark with value of 0x28 and 802.1p tag with a
value of 5. This doesn't correspond to any WMM access category. On
Mac OS X, packets are tagged with Class Selector CS2.
|
|
AudioVideo
|
Flow traffic
has a network priority higher than Excellent
Effort, yet lower than
Voice.
This traffic type should be used for A/V streaming scenarios such
as MPEG2 streaming.
Sent traffic
will contain a DSCP mark with a value of 0x28 and an 802.1p tag
with a value of 5. Corresponds to the WMM AC-VI access category. On
Mac OS X, packets are tagged with Class Selector CS3.
|
|
Voice
|
Flow traffic
has a network priority higher than AudioVideo,
yet lower than Control.
This traffic type should be used for real time voice streams such
as VOIP.
Sent traffic
will contain a DSCP mark with a value of 0x38 and an 802.1p tag
with a value of 7. Corresponds to the WMM AC-VO access category. On
Mac OS X, packets are tagged with Class Selector CS5.
|
|
Control
|
Flow traffic
has the highest network priority. This traffic type should only be
used for the most critical of data. For example, it may be used for
data carrying user inputs.
Sent traffic
will contain a DSCP mark with a value of 0x38 and an 802.1p tag
with a value of 7. This does not correspond to any WMM access
category. On Mac OS X, packets are tagged with Class Selector
CS7.
|
|